Showing posts with label manicure. Show all posts

Wednesday, 28 October 2015

30 Days of Colour - Harvest and Thanks Giving


The eighth prompt for the challenge was 'Harvest' and my other half suggested I do something around a Harvest Moon. I lacked the imagination to make that manicure happen so instead chose to do another stamping manicure with leaves.

Again making use of the the new Revlon polishes I've recently bought, I started off with a base of Revlon ColorStay in 'Fall Mood' a rather appropriately named polish for this manicure. It's a gorgeous copper shimmer polish with really fine glitters. 


I then used a variety of polishes to stamp the leaves using MoYou's Mother Nature Stamping Plate 02. Polishes I used included OPI, and other Revlon ColorStay polishes in Red and Orange, the yellow is Revlon Parfumerie in 'Sunlit Grass'. 


It was such a task to take a photo of this manicure, I top coated everything with Leighton Denny 'Gold Save the Queen' which is a fine Rose Gold Glitter to give it extra sparkle. So getting a picture without the light bouncing and reflecting off my nails and obscuring the leaf pattern was tricky. The Extreme Close up above gives you a better idea!

Next was 'Thanks Giving' and being British I didn't really know what to do. After googling it I opted for more leaves in Thanks Giving themed colours, no Turkey!
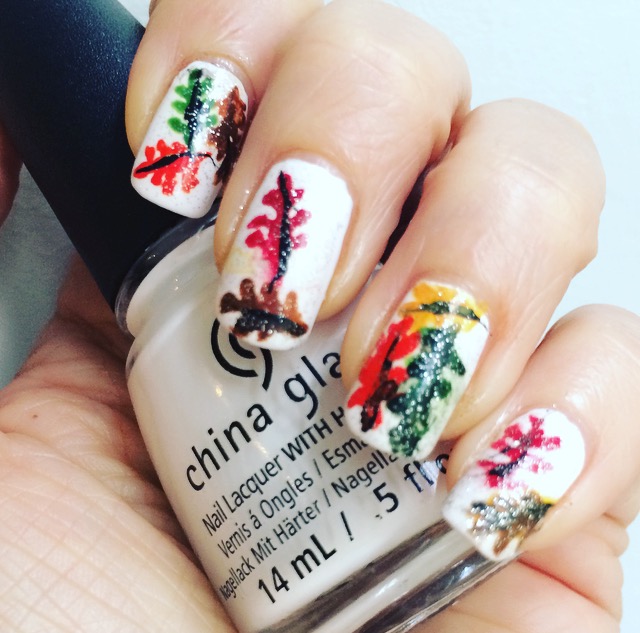

Not overly happy with this one, it look's very child like and I made a couple of errors whilst creating this design. I decided to use acrylic paint for the leaves and after painting a base colour of white, I remembered to put a top coat on so I could remove mistakes. But what I should have also done, is paint a matt top coat so that the paint would adhere to the nail rather than just pool on the shiny top coat.


I'm happiest with the thumb on this design, this was the first nail I painted. It all went pear shaped from there! Again I topped this design off with the Leighton Denny 'Gold Save the Queen' to tie all the design in and Bob's your Uncle!


Sunday, 25 October 2015

30 Days of Colour - Quilted and Pink Glitter

Still chugging on with the 30 Days of Colour Challenge, next prompt was quilted. Wasn't really sure how to tackle this one so spent sometime googling it, to see what others had done. I wanted something a little subtle.


I used striping tape to make the design and after painting the base coat I sponged the glitter polish over the striping tape to create the design. It was difficult to see how well the glitter faded at the top of the design, and you can see it's rather blunt. I would have preferred it to blend out more.

Next prompt was all about the pink again, this time pink glitter! I think pink is actually growing on me now, because what I like most about this manicure is the accent nail. Not sure the glitter worked on the other nails.


Love these Revlon Parfumerie polishes though, this African Tea Rose smells lush. Think the problem here with the glitter was that it didn't contrast with the light pink polish enough. All Revlon polishes here, the light pink is Revlon ColorStay in Natural Pink and the Pink Glitter is Revlon Shining Strength. 

Saturday, 24 October 2015

30 Days of Colour - The Progress

We're about half way through the 30 days of colour challenge and I've completed six manicures, so only four behind. Not too bad and I'm going to keep going. The next prompt of the challenge was denim and I wasn't sure what to do, I saw a few manicures online where they had painted stitching and pockets on the design. There were even designs for acid wash denim.

I didn't want to have my nails too obviously looking like a pair of jeans as I had training on Tuesday night, so I just went with a denim like polish. I had several to choose from, a Barry M one aptly called 'Denim'. 

Or an Essence Polish that is called 'Blue Jeaned' and labelled as a Jean Effect polish.


The polish I picked however was from OPI and is from their Suede line which I never knew existed until recently. This is the Suede version of OPI Ink and it dries to a Matt finish.


OPI Ink is such an amazing polish and the Suede version is nice if you don't want to faff around with a matt top coat, however it doesn't have quite the same colour shift that the original has. This is all I have to say on the matter and manicure...

The challenges next prompt was 'Leaves'. I really wanted to do some stamping for this prompt, but am limited to the very few stamping plates I have. Luckily a recent Nailbox subscription box included a MoYou Tropical Stamping Plate which included some foliage and leaves, although not quite the autumn design I was hoping for.


I hope I saved it from looking too tropical with the colour combination. I picked up a couple of No.7 polishes from Boots last week and the base of this Manicure is one, called 'Star Shower'. It's hard to describe, it has very fine gold, blue and silver glitters in it. I think the base is clear and just jammed packed with glitters, so I was able to make it opaque in three coats.

I used one of the 2true Metallica polishes in 'Aphrodite' I picked up from Superdrug a wee while ago to stamp the leaves with, and it stamped really well. I had to give it a bit more glitter as the leaves hide some of the base so topped the design off with China Glaze's 'Golden Enchantment'. LOVELY!

How well do you get on with stamping and do you have any favourite polishes to stamp with?

Sunday, 18 October 2015

30 Days of Colour Challenge - Catching Oop

So it's fair to say that I'm already behind with the 31 day challenge for this month EVEN though it's a new mani every three days or so. I'm in between jobs at the moment and looking for a job and figuring out what I want to do next is like two full time jobs at once! 

Anyway, enough of my belly aching I'm keen to show you the wonderful creations I've done for the next two prompts! First Up PINK, yes I know, not my favourite colour, however I incorporated a nice Hot Purple/Pink into my Mani below. It's more a gradient than a Pink Ombre, but I can't rock an all pink nail. The inspiration for this manicure was a Thank You card I gave to my other half for supporting me during my time out of work. The card had a lovely purple to pink to orange gradient that I wanted to recreate. Colour is a little off what it truly was in picture below as I've fiddled about with it. The Pink though is a must have from Sally Hansen's Complete Salon Manicure line called 'Aria Ready'.


Day three's prompt was 'Floral' and if you excuse the pun, I nailed it. Not very Autumnal but I don't give a stuff and really didn't want to take it off!


As per usual I looked for ideas online for design and found this design on mycosmeticsbag along with a super easy idea on how to create the flowers. Super easy and really affective.


For my vintage blue I used OPI 'Can't find my Czechbook' one of the first OPI polishes I ever bought. A lovely shade of blue with a drop of green. For the white stripes I used a striping polish I picked up from eBay ages ago, super impressed I managed to get the lines so straight.

Then I used a variety of red and white polishes to create the flowers as per tutorial on mycosmeticsbag and the leaves using a lighter and darker green polish. Simples!

Saturday, 3 October 2015

30 Days of Colour Challenge - Day 1 and bargain polishes!

This month I saw Knitty Nails on Instagram post the following challenge, and as I missed out on last's month challenge I thought I'd take part. Here's the prompts...


I liked the themes and also that it's every couple of days and not every day. I'm catch up with the first prompt already and did it today. Here's my gold manicure.


I saw this on Pinterest and loved the combination of the mint green with the gold, it was either that or purple and gold, that's a classic combination.

I used Revlon's 'Minted' which is a gorgeous colour, but it did take three coats for full opacity. The formula is good and it goes on smooth after the first coat, but as it's a light colour it was a bit patchy. I sponged on the glitter as I didn't want a massive amount of clear base building up on my nails, using Sally Hansen's Complete Salon Manicure in 'Crown Jewels'. Picked this one up in Poundland last week, what an absolute BARGAIN!

This polish is from Sally Hansen's 2013 Sequin OverCoat Collection, I picked up a couple more CSM glitters too, these appear to be from New York Fashion Week Designer collection from 2014. Definitely worth keeping your eyes peeled in your local Poundland, they're also selling pack's of three New York Color (NYC) for £1.

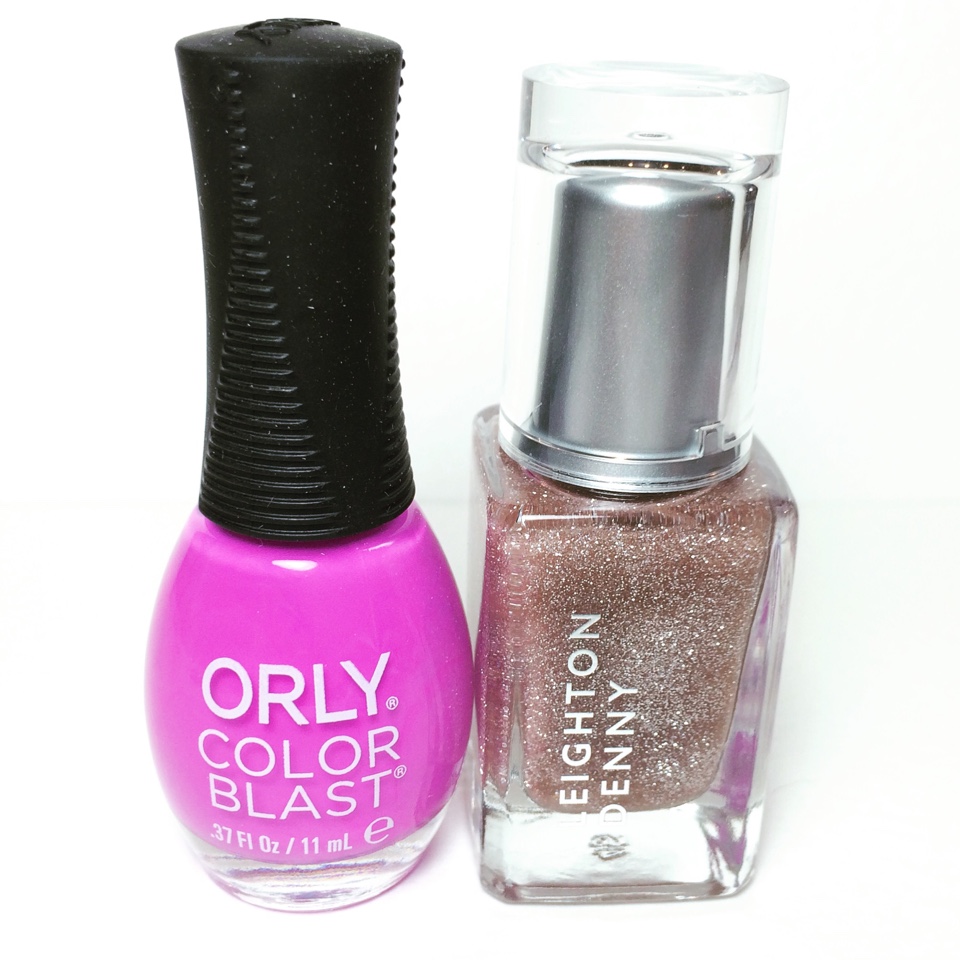
Speaking of affordable polishes, I also picked up these beauties this week as they came free with Elle (Orly) and Bazaar (Leighton Denny) magazine.


There are four to collect of the Orly and six I think for the Leighton Denny, I do like Elle magazine, however I do remember buying Bazaar magazine before for a Leighton Denny polish, it's a little bit up market for me! Also spotted Glamour magazine are including free Nails Inc polishes too this month, so more polishes to keep your eyes peeled for.

Where do you get your bargain polishes from and have you bought any magazines for free beauty products? Let me know in the comments section below.
   

Friday, 2 October 2015

nailbox - September review

September's nailbox was Halloween themed and I couldn't wait to see what creepy colours they had included. I gotta admit that I really look forward to receiving nail polish from nailbox every month as you never know what you're gonna get and it's always a surprise to see what polishes and colours they have included, especially as they may not be the choices you'd necessarily make yourself. Here's this month's goods!


Here we have from left to right, a base coat from Elegant Touch, not one I've tried before as I always use OPI Nail Envy as my base. I'll report back, but let me know if you've tried it and how you rate it.

Next up is this gorgeous bright green from Nails Inc called 'Queen Victoria Street'. This went on like a dream, almost opaque in one coat, but I did two here, formula was spot on!


Next up is a purple metallic polish from Sinful Pro Shine, not to be confused with Sinful Colors and it took me a while to seek them out. These retail at £7.95 each a bottle.

I love the way all of the polish bottles in this months box have the silver cap. Makes me think they're a bit fancy!


This one is a gorgeous colour called  'Show Off' however I found the formula on this a little thick, again I used two coats to get opaque.

This month nailbox included some nail art brushes, which will always go to good use, there is no branding on these so not sure what company they are from.

Last up is a black polish from a brand called True Brit London, this is another brand I've never tried or even heard of. Great formula, have no complains about this one, went on like a dream, may even be a one coater. I layered this over the above polishes as you'll see in my manicure below, so it will need putting to the test. The polish is called 'Taxi Cab' and retails for £12.50, so already you can see that £15 a month for this subscription service is a great deal.

My challenge next was to create a creepy manicure with my new polishes, so had a scout around on the inter-tubes and found this halloween inspired manicure on Lucy's Stash. I created this look using all the polishes above and a white crackle from China Glaze! Here's what mine looks like.


I'm not sure if the green wasn't dry or if it's just highly pigmented as it made the white crackle go yellow, I like it though, more creepy!

Here's some close ups...


Overall another great selection from nailbox, I wonder if we'll be getting something Christmas related in the next box?


Wednesday, 23 September 2015

Confessional of a Nail Polish Addict - Part 2

I've done it again, I only popped in to SuperDrug to buy, well I don't know what and out I walked five minutes later with three brand new polishes in my bag. The next day I purposely went to a different SuperDrug to see if I could pick up the rest of the set... 


So here is my reasoning, SuperDrug have been selling these 2true polishes for a while and I've read from other Bloggers that these are great for stamping. I can confirm they are... I created this mani last night will little trouble from the polish, plate or stamper!


Usually these retail for £3.99 each and it seems that SuperDrug may be discontinuing this line as all 2true cosmetics were on sale for £1. I managed to pick up the red, blue and purple on my first visit and bagged the green and the teal on my second. These as the names suggests are metallic polishes and swatched really well with only two coats to make opaque.


Along with the Metallic polishes I also picked up three others from their Salon Shine line. I already had the purple from this collection which I bought over a year ago so I picked up the other three. I think there are only four colours.


Again formula was great on these polishes and two coats were used on the following swatches, in particular I really like the shade of red and orange. 


These are an absolute steal at £1 each and because I had clocked up some SuperDrug Points it cost me a total of £6 for all 8 polishes, what a BARGAIN! So get yourself down to your local SuperDrug if you fancy picking up these lovelies, before they're all GONE!

Seeing Spots - Off Centre Dotticure

So as I'm on this supposed 'No Buy' and probably remain on it till the end of the year, it's time to return to my untried polish stash and see what designs I can conjure up.

 These two polishes are my favourite type, dark and vampy with a slight metallic finish to them, and I thought they'd make a pretty good pairing allowing me to tick TWO more polishes off the untried list.

These gorgeous beauties are:

No7 - Temptress (The burgundy one)
Sally Hansen Insta-Dri - Grape Escape


Lovely colours and formulas, only two coats of Grape Escape but three coats for Temptress. I kept this manicure for a day and then decided I needed to jazz it up a little. So searched Pinterest and saw a design where the dotting was only on one side of the nail. So this is what I did. I kept the colours to gold, silver and copper, and then decided to add a few dots of the alternate base colour to finish off.

I'm now eagerly awaiting the arrival of Septembers NailBox this is the only polish I'm allowing myself, yeah right). Think this one is gonna be Halloween themed so spooky manicures coming your way soon...

Wednesday, 16 September 2015

Bokeh Nails

Many Nail Art Bloggers and Vloggers are doing the 31 Day Challenge this month and I'm missing out as I thought it was next month as there are 31 days in October but not September. The challenge is to do a different manicure every day for 31 days based around the following themes.


I've completed this challenge twice once in January this year and for the first time in September last year (why I thought it was October, I have no idea).

Whilst following others progress I came across a nail art technique called Bokeh so thought I'd have a go. Bokeh is a photography effect where you blur a background on a photo so that it appears as little circles of light, much like the affect on the 31 Day Challenge image above.

I first found inspiration from ohmygoshpolish who created Bokeh nails for her Day 1 Red Nails manicure, here's what she did and how she did it:


I followed her tutorial to create my look but used blue varnish along with white and a light metallic blue as my base.


Very happy with how this manicure turned out, I think next time I'll do more layering of the dots to give the design more depth, I only did three layers, so maybe so four next time.

THEN I saw this tutorial for Bokeh Nails when rummaging through YouTube created by Cute Polish, so I thought I'd give this a go too. Super easy to do, actually both of the nail art effects are and they really look amazing.


I omitted the gold accents, and used purple, blue, pink and teal colours, but you can use what ever colour combination you want.


Really love the way these look, I'm wondering what these might look using black acrylic paint to create the Bokeh-lites!

Which one do you like best, or have you tried Bokeh nails, and how did you create the effect?

Wednesday, 9 September 2015

Confessions of a Nail Polish Addict

When I realised that I had a nail polish addiction it was already too late and I had amassed over 200 bottles of the stuff! I'm not sure what exactly, and still don't fully understand why this cosmetic has captured my imagination.

I was never into make-up as a teenage and only recently towards my late thirties have I taken all that must interest in the confusing and overwhelming world of beauty products out there and how to apply them to your mush!

However I have always had a creative side and perhaps that's why I love it so... the multitude of colours (I have about 50 purple polishes and I swear no two are the same) the effects and things that you can do with them is endless and only limited by your own imagination. Nail polish manufacturers, mostly indie, are forging the way with new effect polishes whether the trend be crackle, thermal, textured, flakies or holo's and the designs that nail bloggers and vloggers are coming out with every week delights and surprises me.

Now I own over 500 polishes and even this doesn't seem to be enough, just this last week when self proclaiming my own 'No Buy' did I buy 6 more bottles!

First up is a polish I've been hankering after for a while. It's a green scattered holographic polish from Orly called 'Sparkling Garbage'. I picked this up in a set of two polishes from TK Maxx for £9.99. So not a bad price for Orly polishes as one bottle from the brand can set you back as much.


I'm not sure if you can layer this polish up to full opacity, so I used it as a topper to a polish I bought from Next called 'Anaconda'. Next have a relatively small selection of polishes in their stores but the colours and glitters they have are apparently irresistible! Their bottles are a unusual rectangular shape and every time I've visited the shop they are 3 for 2, so I now own 9!

I've also been lusting after OPI DS's polishes. Mostly the first set they brought out which is like gold dust and has the most amazing linear holographic polishes. I spotted this next one again in TK Maxx for £3.99 and had to bag it. Again you can pay up to £15 for these silver capped bottles.


This polish is bright red and has a gold shimmer running through it, seen more in the bottle than on the nail unfortunately. It's also quite sheer, probably the reason it was in TK Maxx, and took three coats for some sort of opacity. I topped this one off with another polish from Next called 'Miami Heat' a gorgeous red and gold sort of flakie glitter. They're not flakies in the conventional sense, but the glitter in this polish isn't of any discernible shape.

So I've failed miserably on not buying polish, the only way I can see myself stopping is by not going into any shops that sell it! I still plan to resist, how long for I don't yet know...

Monday, 27 July 2015

nailbox - July Review

This week I received my second box of goodies from nailbox and was very impressed with what I found inside. Apparently nailbox usually post about the content of their monthly subscription service but this month was a mystery with the teaser of a Tropical Theme.

Here's what was inside!


OPI - Kiss Me I'm Brazilian
Barry M - Need for Speed 
China Glaze - White on White
Elegant Touch - Cuticle Eliminator
AND a MoYou Tropical Stamping Plate and Squishy Stamper

Here's the plate with images in full:


These images are slightly smaller that some of the ones I've seen on other MoYou plates, but plenty big enough for my little nails. I did a couple of stamping manicures with this and the squidgy stamper you also get in this box works a treat.

Here was my first go, I painted a black base and then used two MoYou stamping polishes I already had in pink and blue to stamp with and create this gradient stamping. I fancied a matt look so popped a matt top coat over the whole caboodle to finish the look.


Rather pleased with the overall effect. Then I decided to use the polishes in the box to create a new manicure with palm trees.


First I painted my nails with two coats of China Glaze 'White on White' let those dry and then sponged the Barry M and OPI polishes over the top to create the gradient. The Barry M was picking up the previous gradient layer, not sure if this was due to it being a quick dry polish or if my white base wasn't completely dry. So I sponged the gradient three times to get the colours bright. I also used a liquid latex to cover my cuticles before sponging the gradient. Much less clean up.

I topped coated with HK Girl and as it was late, left the stamping bit for the next morning.

I used all three palm tree designs from the Plate and I also wanted some birds in the design too, but didn't have any stamping plates suitable, so just painted these on free hand. Then when dry just finished off with a regular top coat as I didn't want to smudge the design.

As for the polishes the OPI and China Glaze as always were spot on. The China Glaze was a little runny so make sure you do thin coats as it will pool in your cuticle if you load the brush up with polish. Also my step daughter painted her nails with the Barry M polish and it dried super quick.

Well done nailbox I love what you sent me this month, and what I'm also super impressed with is that as I have A LOT of polish, so far not received anything I have already!

Can't wait till August's box. Have you subscribed to nailbox, and what do you think of the service and what designs have you created with this months Tropical Treat? 

Thursday, 23 July 2015

Neon Watermarble Nails

So I'm venturing into the scary world of water marbling once more, and this time it WORKED! I think the trick here was that I left a bottle of tap water in the house for a good few days so it was well and truly at room temperature.

Inspired by the Water Marble queen Colette at My Simple Little Pleasures and this tutorial!


I've seen quite a few Vloggers now doing watermarbling designs with clear polish as this one does. Some brands now are selling specific clear polish to water marble with but I used Essie's all in one base coat and top coat for my water marble which worked fine and I think Colette used a regular top coat too. Just don't use a quick dry top coat like Seche Vite or HK Girl as it won't work.

I copied Colette's colour scheme gradient to start off with, using the following polishes:

Purple - Orly Be Daring
Blue - Nails Inc Kensington Park Road
Yellow - Orly Glowstick


Then I did my water marble using China Glaze 'Liquid Leather' as Colette does in her manicure and the Essie All in One base and top coat and when I had cleaned up I topped with China Glaze 'Fairy Dust'. 


Some nails came out better than others, but overall I'm really happy with my attempt, especially the thumb nail in the picture above. I'm also less scared of having a go at water marbling again, although it is still a bit messy!


Sunday, 19 July 2015

Leopard Print?

For some reason I've become a big fan of animal print things lately. I used to really hate any thing animal printy, but it's become less tacky now especially with the interpretations and colour mixes you can now get rather that the old fashioned Bet Lynch leopard print.


Double Leopard print, this has to be a worse fashion faux par than Double Denim.

Anyway, I spotted (no pun intended) this polish in Claire's sometime ago and kept revisiting it, so last time I was in there with the 3 for 2 offer I thought I'd pick it up. I've never seen a polish with Leopard print shaped glitters in it. Here's what it looks like...


and here's the extreme close up...


The polish was a little gloopy and it took a little fishing to get the leopard shaped glitters out, but once you started they were like buses and you seemed to get two or three at once. In fact the shot above looks like I have two layered together.

Not sure I like this look so next time I'll try this over a lighter colour. Also I think I'll just pick out the leopard shaped glitters and place them on my nail leaving out the flakies. Needless to say, this was a bugger to get off the nail. Acetone and foil was required and some picking at the bigger glitters. Let's see if I can make this polish work with some thinner and nail placement.

How do you created your animal print nails? Do you stamp, free hand or use wraps, let me know what you find works best.


Neon, Neon, Neons Part II

My Neon order has arrived and I've been trying out some bright nails. I ordered these little bottles of happiness from The Nail and Beauty Link who have the best prices I've seen for Orly polishes. All prices as shown on the website are without VAT, so these came to £6 each. From left to right these are:

Glow Stick
Risky Behaviour
Be Daring
Fireball


Strictly again you could say some of these aren't true neons, GlowStick definitely is and is described as a true highlighter yellow. I've not gotten round to wearing all of these lovely polishes yet, however as purple is my favourite colour, I chose 'Be Daring' to wear first!


Gorgeous, gorgeous bright purple, and considering that I have many, many purple polishes and is probably the colour I have most of, I don't already have this shade. As will most Orly polishes the formula and brush were up to the job and this was opaque in two coats.

I think I'll try a gradient with the other colours and maybe a go at water marbling like this amazing manicure from My Simple Little Pleasures.


Wish me luck, not had much luck with water marbling, but hopefully using just two polishes I may get away with! 

Here's my other polish purchases I made last week in Manchester from Urban Outfitters, I love their W.I.P polishes and the neon yellow was only £3 in their sale, the shade is very similar to Orly's Glow Stick but this one has a shimmer running through it too.


The other two I picked up where Glitter polishes and these are 'Bits N Bobs' which is a lovely mix of all types of glitter in neon yellow, white and green. The polish at the front on the right is called 'Mardis Gras' and you can see that it's an explosion of all different colours and sizes of Hex glitter. Can't wait to try these, not sure what I'm going to do with them yet!

Wednesday, 8 July 2015

Neon, Neon, Neons

Last week some of my favourite nail Vloggers did a collab video on their favourite neon polishes. This is a colour and style I've never sported myself as I often opt for dark vampy shades but for some reason these videos rekindled my nail polish addiction and I hunted down some the top polishes they picked and raided my collection to see if I had anything I could sport until my new bottles arrived.

Seemed I had a few polishes that claimed to be 'Neon' but the jury seems to be out on what each person considered a neon polish to be and don't even start on Neon Pastels.


This is Nails Inc 'Kensington Park Road', it's probably not a true neon as it's a blue, but it sure is BRIGHT. I layered this over a white base too in order to make it pop. (Again the jury is out on whether you need to layer a true neon over a white base or not).

I also found a Nails Inc polish in a bright Orange Neon called 'Optic Flame' but my mani chipped quickly and my pointer finger on my left hand that I'd been patching for a week broke off very low so lovely swatching pictures weren't to be...

However some of my Neon polishes have NOW arrived, so I need to create some eye smarting manicures with them and share them with you all!

In the meantime, I took a trip to Primark and purchased some of their £1 stick on nails to cover the ruination that is my nails at, they seem to be breaking quite easily at the moment. These have lasted a day so far although my thumb nail did ping off, but was quickly stuck back on with no bother.


Love these little bright triangles, have a thing about triangles at the mo, not sure why! Let's see how long these last! Next stop NeonVille!

Do you love or loathe Neons? Let me know in the comments below and also what you think about Primark Nail products as whole? I have quite a few polishes too, and for a £1 I think their formula's and colours are really good, undecided on the stick on nails though...