Sunday, 18 October 2015

30 Days of Colour Challenge - Catching Oop

So it's fair to say that I'm already behind with the 31 day challenge for this month EVEN though it's a new mani every three days or so. I'm in between jobs at the moment and looking for a job and figuring out what I want to do next is like two full time jobs at once! 

Anyway, enough of my belly aching I'm keen to show you the wonderful creations I've done for the next two prompts! First Up PINK, yes I know, not my favourite colour, however I incorporated a nice Hot Purple/Pink into my Mani below. It's more a gradient than a Pink Ombre, but I can't rock an all pink nail. The inspiration for this manicure was a Thank You card I gave to my other half for supporting me during my time out of work. The card had a lovely purple to pink to orange gradient that I wanted to recreate. Colour is a little off what it truly was in picture below as I've fiddled about with it. The Pink though is a must have from Sally Hansen's Complete Salon Manicure line called 'Aria Ready'.


Day three's prompt was 'Floral' and if you excuse the pun, I nailed it. Not very Autumnal but I don't give a stuff and really didn't want to take it off!


As per usual I looked for ideas online for design and found this design on mycosmeticsbag along with a super easy idea on how to create the flowers. Super easy and really affective.


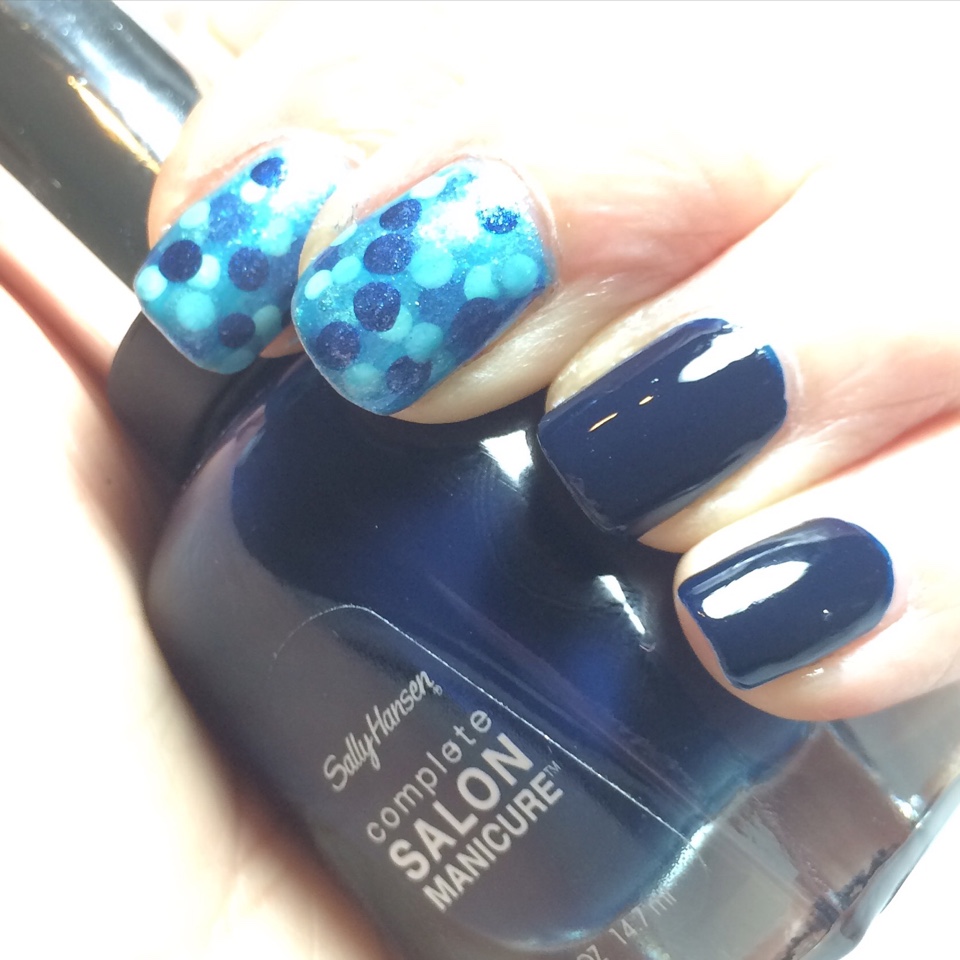
For my vintage blue I used OPI 'Can't find my Czechbook' one of the first OPI polishes I ever bought. A lovely shade of blue with a drop of green. For the white stripes I used a striping polish I picked up from eBay ages ago, super impressed I managed to get the lines so straight.

Then I used a variety of red and white polishes to create the flowers as per tutorial on mycosmeticsbag and the leaves using a lighter and darker green polish. Simples!

Monday, 5 October 2015

Making a Nail Polish Rack

I currently store all my polish in a Helmer that I bought from Ikea for £25. It's the perfect storage for Nail varnish and can hold up to 500 polishes. However... they are hidden away and I can't see them and often spend time rooting through the draws trying to find a polish that I'm after.

What a lot of people do, especially Nail Polish Bloggers is display their lovelies in a Nail Polish Rack which makes a great background for videos. I've been eyeing racks up (Whay Hey) on the internet and you can pay anywhere between £25-£75 for them depending on how big what the colour is etc... I've also watched a few You Tube videos on how to make your own as you can do this rather inexpensively using Poster Board and wood, which is what I opted for as I wanted something that was going to be sturdy. I settled on using this video as a guide.


The problem I encountered was finding a finished wood in the size that they used in this video for a decent price. B&Q here in the UK had some packs of wood you could buy but this worked out £9-£10 a plank and I'd need three, so I opted for this Softwood CLS which was offer for £2.50 a piece but these were 38mm thick and 63 mm in width.

I also didn't have a fancy saw like they had in the above video so just used a regular saw to cut my pieces.


 As the wood was much thicker I used long screws to fix it together. Drilling through the side panels so I only had to screw into the shelves. Actually I got my other half to screw these in as it was still quite difficult.

Once assembled, I sprayed with two coats of primer and then three coats of spray wood paint in a cream colour. I ran out of spray after the last coat and I think it could have used another to hide the wood knots. I got all my paint and primer from B&Q too, however I did find cheaper at Wilkos after I'd make the rack!


I bought two Poster or Mounting Boards from HobbyCraft for the back and nailed these on to the rack once cut to size with some small nail tacks which I bought from a local hardware store for 99p.

And here is the finished rack with me polishes on it!


Very happy with the result, I'll need to build a few more however to hold ALL my polish, so quite a few bottles are still hiding in my Helmer. I enjoyed the process in making the rack so I'd recommend trying this if you like DIY or building things, here's a full breakdown of all the materials (with links where possible) I used and prices.

3 x Softwood Planed CLS Timber (T)38mm (W)63mm (L)2400mm = £7.50
Ivory Satin Spray Paint 400ml = £6.74
2 x Mount Board in cream from HobbyCraft = £6
Pack of 75mm Screws from B&Q = £5
Bag of 100 Tacks/Small Nails = 99p

So it worked out to be £31.22 to build the rack and I do have screws, tacks and Mount Board left over if I wanted to make another. I've been able to store 108 polishes in this rack including the ones I've stored on the top as I made my shelves a little longer so I could storer 14 polishes per shelf.

Have you bought or made your own Nail Polish Rack and how much did you pay and how many polishes does it hold?

Saturday, 3 October 2015

30 Days of Colour Challenge - Day 1 and bargain polishes!

This month I saw Knitty Nails on Instagram post the following challenge, and as I missed out on last's month challenge I thought I'd take part. Here's the prompts...


I liked the themes and also that it's every couple of days and not every day. I'm catch up with the first prompt already and did it today. Here's my gold manicure.


I saw this on Pinterest and loved the combination of the mint green with the gold, it was either that or purple and gold, that's a classic combination.

I used Revlon's 'Minted' which is a gorgeous colour, but it did take three coats for full opacity. The formula is good and it goes on smooth after the first coat, but as it's a light colour it was a bit patchy. I sponged on the glitter as I didn't want a massive amount of clear base building up on my nails, using Sally Hansen's Complete Salon Manicure in 'Crown Jewels'. Picked this one up in Poundland last week, what an absolute BARGAIN!

This polish is from Sally Hansen's 2013 Sequin OverCoat Collection, I picked up a couple more CSM glitters too, these appear to be from New York Fashion Week Designer collection from 2014. Definitely worth keeping your eyes peeled in your local Poundland, they're also selling pack's of three New York Color (NYC) for £1.

Speaking of affordable polishes, I also picked up these beauties this week as they came free with Elle (Orly) and Bazaar (Leighton Denny) magazine.


There are four to collect of the Orly and six I think for the Leighton Denny, I do like Elle magazine, however I do remember buying Bazaar magazine before for a Leighton Denny polish, it's a little bit up market for me! Also spotted Glamour magazine are including free Nails Inc polishes too this month, so more polishes to keep your eyes peeled for.

Where do you get your bargain polishes from and have you bought any magazines for free beauty products? Let me know in the comments section below.
   

Friday, 2 October 2015

nailbox - September review

September's nailbox was Halloween themed and I couldn't wait to see what creepy colours they had included. I gotta admit that I really look forward to receiving nail polish from nailbox every month as you never know what you're gonna get and it's always a surprise to see what polishes and colours they have included, especially as they may not be the choices you'd necessarily make yourself. Here's this month's goods!


Here we have from left to right, a base coat from Elegant Touch, not one I've tried before as I always use OPI Nail Envy as my base. I'll report back, but let me know if you've tried it and how you rate it.

Next up is this gorgeous bright green from Nails Inc called 'Queen Victoria Street'. This went on like a dream, almost opaque in one coat, but I did two here, formula was spot on!


Next up is a purple metallic polish from Sinful Pro Shine, not to be confused with Sinful Colors and it took me a while to seek them out. These retail at £7.95 each a bottle.

I love the way all of the polish bottles in this months box have the silver cap. Makes me think they're a bit fancy!


This one is a gorgeous colour called  'Show Off' however I found the formula on this a little thick, again I used two coats to get opaque.

This month nailbox included some nail art brushes, which will always go to good use, there is no branding on these so not sure what company they are from.

Last up is a black polish from a brand called True Brit London, this is another brand I've never tried or even heard of. Great formula, have no complains about this one, went on like a dream, may even be a one coater. I layered this over the above polishes as you'll see in my manicure below, so it will need putting to the test. The polish is called 'Taxi Cab' and retails for £12.50, so already you can see that £15 a month for this subscription service is a great deal.

My challenge next was to create a creepy manicure with my new polishes, so had a scout around on the inter-tubes and found this halloween inspired manicure on Lucy's Stash. I created this look using all the polishes above and a white crackle from China Glaze! Here's what mine looks like.


I'm not sure if the green wasn't dry or if it's just highly pigmented as it made the white crackle go yellow, I like it though, more creepy!

Here's some close ups...


Overall another great selection from nailbox, I wonder if we'll be getting something Christmas related in the next box?


Wednesday, 23 September 2015

Confessional of a Nail Polish Addict - Part 2

I've done it again, I only popped in to SuperDrug to buy, well I don't know what and out I walked five minutes later with three brand new polishes in my bag. The next day I purposely went to a different SuperDrug to see if I could pick up the rest of the set... 


So here is my reasoning, SuperDrug have been selling these 2true polishes for a while and I've read from other Bloggers that these are great for stamping. I can confirm they are... I created this mani last night will little trouble from the polish, plate or stamper!


Usually these retail for £3.99 each and it seems that SuperDrug may be discontinuing this line as all 2true cosmetics were on sale for £1. I managed to pick up the red, blue and purple on my first visit and bagged the green and the teal on my second. These as the names suggests are metallic polishes and swatched really well with only two coats to make opaque.


Along with the Metallic polishes I also picked up three others from their Salon Shine line. I already had the purple from this collection which I bought over a year ago so I picked up the other three. I think there are only four colours.


Again formula was great on these polishes and two coats were used on the following swatches, in particular I really like the shade of red and orange. 


These are an absolute steal at £1 each and because I had clocked up some SuperDrug Points it cost me a total of £6 for all 8 polishes, what a BARGAIN! So get yourself down to your local SuperDrug if you fancy picking up these lovelies, before they're all GONE!

Seeing Spots - Off Centre Dotticure

So as I'm on this supposed 'No Buy' and probably remain on it till the end of the year, it's time to return to my untried polish stash and see what designs I can conjure up.

 These two polishes are my favourite type, dark and vampy with a slight metallic finish to them, and I thought they'd make a pretty good pairing allowing me to tick TWO more polishes off the untried list.

These gorgeous beauties are:

No7 - Temptress (The burgundy one)
Sally Hansen Insta-Dri - Grape Escape


Lovely colours and formulas, only two coats of Grape Escape but three coats for Temptress. I kept this manicure for a day and then decided I needed to jazz it up a little. So searched Pinterest and saw a design where the dotting was only on one side of the nail. So this is what I did. I kept the colours to gold, silver and copper, and then decided to add a few dots of the alternate base colour to finish off.

I'm now eagerly awaiting the arrival of Septembers NailBox this is the only polish I'm allowing myself, yeah right). Think this one is gonna be Halloween themed so spooky manicures coming your way soon...

Wednesday, 16 September 2015

Bokeh Nails

Many Nail Art Bloggers and Vloggers are doing the 31 Day Challenge this month and I'm missing out as I thought it was next month as there are 31 days in October but not September. The challenge is to do a different manicure every day for 31 days based around the following themes.


I've completed this challenge twice once in January this year and for the first time in September last year (why I thought it was October, I have no idea).

Whilst following others progress I came across a nail art technique called Bokeh so thought I'd have a go. Bokeh is a photography effect where you blur a background on a photo so that it appears as little circles of light, much like the affect on the 31 Day Challenge image above.

I first found inspiration from ohmygoshpolish who created Bokeh nails for her Day 1 Red Nails manicure, here's what she did and how she did it:


I followed her tutorial to create my look but used blue varnish along with white and a light metallic blue as my base.


Very happy with how this manicure turned out, I think next time I'll do more layering of the dots to give the design more depth, I only did three layers, so maybe so four next time.

THEN I saw this tutorial for Bokeh Nails when rummaging through YouTube created by Cute Polish, so I thought I'd give this a go too. Super easy to do, actually both of the nail art effects are and they really look amazing.


I omitted the gold accents, and used purple, blue, pink and teal colours, but you can use what ever colour combination you want.


Really love the way these look, I'm wondering what these might look using black acrylic paint to create the Bokeh-lites!

Which one do you like best, or have you tried Bokeh nails, and how did you create the effect?