Saturday, 25 April 2015

Until the next Nail Art Challenge

So whilst I'm waiting for my next challenge to arrive, I'm concentrating on what's left of my untried polishes as I've made a MASSIVE dent in them. I have a couple of these MIcro-Dot polishes and not sure what to do with them for best effect.

I topped these over Models Own 'Banana Smoothie' and quite liked the effect, reminds me of sprinkles on a cake, and who doesn't like cake?


The Nails Inc polish was in a set of three from Savers and is called KnightsBridge Place. Took a bit of fishing for the glitters but only used one coat.

Next on the untrieds list was this Revlon scented polishes called 'Raspberry Rapture'. It smells great and the colour is a little more on the raspberry side rather than being the right red here in the pic. It did however take three coats for full opacity. 


In order to sneak in an extra untried I used Sally Hansen SugarCoat textured polish in 'Pink Sprinkle' on my accent nails. It's a pink sheer polish with what looks like orange glitter. I have a few more of these SugarCoat polishes in the untried rack, I'm thinking I needs some nail vinyls to use these with...


Deciding what to wear for Spring

I'm never been much of a bright colours person, but of late I've been stretching my colour boundaries and trying not only some new colours in my wardrobe but also on my nails.

This was my first attempt and was inspired by a skirt I bought from Forever21 which as the design shows below is green with black polka dots. I love it. It's a pencil skirt and I paired it with bright purple shoes and a 'black' T-Shirt and denim jacket. I didn't want to over do the colour.


I bought these Models Own HyperGel polishes in a set from Superdrug and they are a slightly smaller bottle size at 10ml. These really are lovely bright shiny polishes and the other great thing about buying this set is that it included bright colours that I might not normally have purchased.


Next was a Spring gradient, as this Colour Show Bleached Neon in Chic Chartreuse has been sitting on my untrieds rack for some time. I thought it would make a nice transition from purple (which you can't see very well here) through to blue and then the green.

Plan was to stamp over this with gold, but didn't have enough time after creating the gradient, so left it as it was!

Tuesday, 7 April 2015

Recent adventures in nail varnish

I've not had much time to do my nails justice recently and took pleasure in having a break from trying to keep up with January's 31 Day Nail Art Challenge.

There have been some techniques I've wanted to try out however and I STILL have a fair amount if untried polishes in my possession. 

Doing Nail Art is a great way to try out polishes that have not yet graced your fingers and the below manicure is a perfect example of this. 

Occasionally the Nail Polish facebook Group I'm a member of has an anything goes weekend where you can post not only nail varnish you have for sale but anything else from, clothes to makeup and baby and children's toys.

I picked three Barry M polishes for the meagre price of £1.50 and I used them to create this tie dye effect manicure.


I used a sponge to create this pattern and just blobbed on spots of four different colours and sponged them on to my nails over a white base. I repeated this a couple of times until I was happy with the colour and design. This would have worked well as a galaxy too.

The manicure I did before didn't stay on as per usual I didn't have enough time or patience to wait for the polishes to completely dry before taping up and painting the triangle colour. I also wanted to add a few gems or stick something on my nails from my recent hobby craft and Instagram win.


Here's what I came up with, you can see the unstraightness (that's not even a word) of the lines. Colour combo OK, I used the free Nails Inc polish that came free with Marie Claire magazine last month and Essie's 'Fair Game'. Bobbed a gem on the accent nail from a set I bought a Hobby Craft. Next Blog post will be of all the gubbins I've bought recently and where from.

I created a glitter triangle on my thumb nails for this manicure which came out quite well too. I love how this looks on the macro pic below, I used 'Girls on Film' by GOSH!


Last but not least I have to start using the Models Own polishes I purchased in the sale a little while ago, they are sat on the top row of my untried taunting me! 

This one is from the BeetleJuice Collection called 'Purple/Blue'. It's a Duo Chrome of my two favourite colours. Lovely! 


Drawing Pin Inspired Mani


Fancied doing a bit of free hand painting again and this time the inspiration comes from some drawing pins. The design is of these little blue and pink abstract flowers. Here are the pins in question:


They came in a lovely little floral tin and I've used them to pin my necklaces to a cork notice board in order to restore order to my growing jewellery collection.

I painted a dark blue base and used white, pink and several shades of blue to create the flower pattern using a small nail art brush.

Great thing about doing these abstract flower designs is that the right hand looks OK too as you don't do an exact design and every nail is different! Top manicure tip for you there!

Thursday, 19 March 2015

Phone Case Inspired Mani

I recently changed my phone case and thought that the pattern on my old one would make for an interesting nail design.

I think I'm also finding my own style and the type of manicures I like to do most. The last few manicures I did in the last 31 day challenge were around water colour type of effects or abstract art designs. These are what I enjoy most and think look great on my nails.

So here was my next challenge and I managed to dig out quite a few of my untrieds in order to create this look.


I started off with my favorite off-white polish 'My Boyfriend Scales Walls' from OPI as my base. I used an ultra fine long thin nail brush to start the design. I started with black to create the lined diamond shapes you can see above, making them using a variety of long and different shaped lines.

Then I used that same long tipped brush to paint on the other colours around the outside of the black shapes. I started with the orange, then moved on to the pink, purple and finished with the light blue, dark blue and anywhere I thought needed darkening up I went over with the black. Here's the finished result.


Super tricky to get a good pic of this and to capture the colours. Here's a good old close up so you can see the design and get a better idea of how it was created.


Very, very happy with this design and will be looking out for more inspiration from everyday things.

I also had a little splurg a little while ago and here is one of the goodies I horded. Essie's 'Dive Bar' this was a stop gap between my Nail Art attempts.


This was two coats and Top Coat, the first coat was rather patchy but second coat went on like a dream. This polish is a very dark teal with a colour shift to purple, my favorite colours. What are yours?


Sunday, 8 March 2015

Cats and more adventures in Nail Art

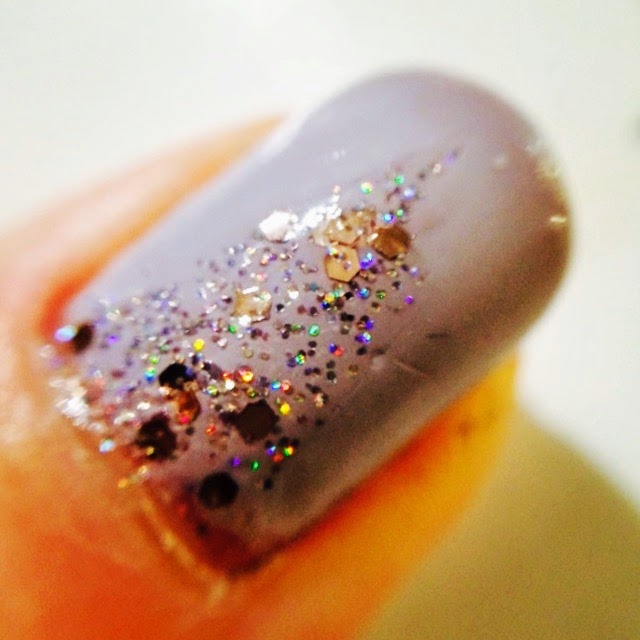
After my adventures in Nail Art, I have been inspired but however unimpressed with my efforts. I did create a shimmery grey manicure with triangular metal studs, however I wasn't patience and mushed the polish when applying them.

Then my other half picked these puss puss decals up that were on the dining room table and said "When are you going to use these?". No better excuse so I thought I would.


I purchased these gorgeous decals on Etsy from NorthofSalem for the small sum of £3.41. The shop is in the US, but they arrived very quickly and the nice thing about these is that they are all different sizes, so great no matter if you have long or short nubbins.

Here's what I created with them along with an attempt to use some untrieds polishes.


In particular I needed to use this Acid Wash polish from ColorShow and based my theme around this. Personally I think it's too busy, I like the dotty nails and the cat decals, just not keen on the accent nail with the Acid Wash polish. I have all four of the Acid Wash polishes ColorShow came out with. The only one I really like is the one in the clear base. The others are to gloopy and sheer that you need several coats to make the base colour opaque. In the mani I layered it over the olive colour I used on my other nails, I stilled needed two coats.

Unfortunately you have to be VERY careful with Top Coating these decals, the first one I applied I topped with HK Girl quick dry top coat and it basically melted the decal. This one I used a bog standard top coat and then after I took this picture I decided I wanted to pop some H K Girl on too. I thought it would be OK having been top coated already, however it partially melted it's bum!

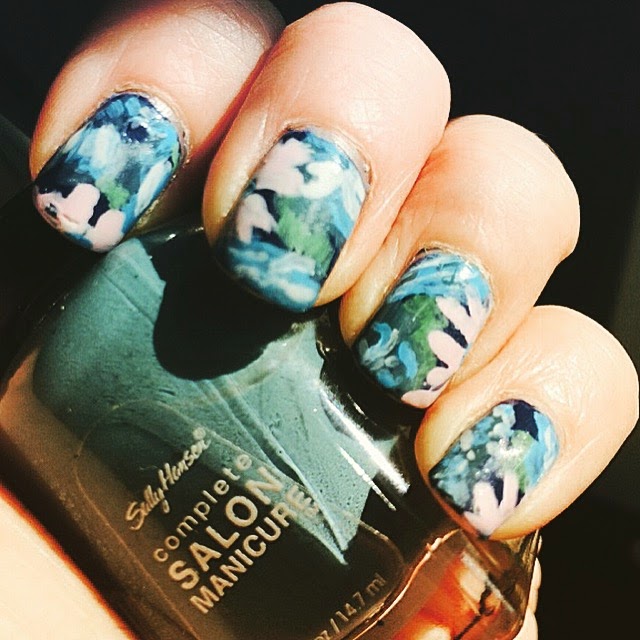
This manicure didn't stay on long and I'm pleased to say, third time lucky, I was very happy with my next Nail Art attempt. Inspired by the pattern on a top I bought from Primark, I created this design.


It's an abstract flower design, really pleased with the way they came out, and even better I figured out the macro lens I bought for my phone, so here's an EXTREME CLOSE UP!


I just used a nail art brush to dab the polishes on and layered each colour over each other. Very pleased with the results and this will be staying on my nails for as long as possible.

Whilst I was creating this manicure this is what my cat was doing, sitting on my nail art brushes. She doesn't like to sit on my lap when I do my nails, she doesn't like the smell of polish and remover.


Adding to my crazy cat lady theme, when hunting in Hobby Craft for Nail stuff and glitter, I came across these adorable little wooden cats. My friend makes jewellery and so she helped me make them into these lovely earrings!


I've also bought shed loads of glitter and things to stick on to my nails. I also bought quite a few glass pendants and housings so I'm hoping to make some nail polish jewellery, more on that soon!

Wednesday, 4 March 2015

Instagram Giveaway Prize from Effiena's Hand Made Polish

I've recently been getting into the old Instagram thing, and even sent my first Direct Message on there last week. I did NOT know you could do that. One thing that I'm really enjoying is finding new people to follow, especially UK Indie Nail Polish makers and also winning my first Giveaway!

Many Instagramers (if thats's what you call them) celebrate like Vloggers do on YouTube, when they reach a significant number of followers or subscribers. Often to celebrate they will run a giveaway where all you usually need to do if you follow them, is repost their giveway pic and tag it to interested and participating parties.

I was lucky enough to win one of these giveaways run by a UK Indie Nail Polish maker called Effiena. I found her through the lovely Samantha Rogers over at The Nail and Beauty Files.

Effiena was giving away one of her lovely polishes and some nail art goodies for reaching 500 followers on Instagram and I was the lucky winner. Here's what she sent me!


As if I hadn't acquired enough shinies at the weekend, thanks to Effiena I have more nail stickers, gems and guides to use along with some pretty good nail art brushes too. I really need to get cracking. But before I do I wanted to try Effiena's polish which is from her chameleon collection, The one I chose is called Plum Ultra-Marine.


Look at this! I layered it over a dark purple polish. She describes the colour shift on this polish as Lilac to Blue to Green. You can see the shift in the picture and I guess it may depend what effect you get on what colour you choose as your base. So I'll be trying this over a few different colours I think!

Formula was very good. The above shows one good coat for this effect. I also found this dried surprisingly fast too, considering I had two coats of base colour, I had no issue with dry time and didn't feel the need to top coat.

You can find Effiena over at facebook, Instagram and purchase her polishes on her Etsy shop called EffienaNailPolish. They retail from £2 up to £4.50, so a really good price for an Indie polish. Oh and I just found out she has a blog too. I was right about the dry time, her Chameleon polishes are quick dry!

Thank you so much Effiena for the wonderful giveaway, looking forward to creating some funky nail art with my new found supplies.