Monday 27 July 2015

nailbox - July Review

This week I received my second box of goodies from nailbox and was very impressed with what I found inside. Apparently nailbox usually post about the content of their monthly subscription service but this month was a mystery with the teaser of a Tropical Theme.

Here's what was inside!


OPI - Kiss Me I'm Brazilian
Barry M - Need for Speed 
China Glaze - White on White
Elegant Touch - Cuticle Eliminator
AND a MoYou Tropical Stamping Plate and Squishy Stamper

Here's the plate with images in full:


These images are slightly smaller that some of the ones I've seen on other MoYou plates, but plenty big enough for my little nails. I did a couple of stamping manicures with this and the squidgy stamper you also get in this box works a treat.

Here was my first go, I painted a black base and then used two MoYou stamping polishes I already had in pink and blue to stamp with and create this gradient stamping. I fancied a matt look so popped a matt top coat over the whole caboodle to finish the look.


Rather pleased with the overall effect. Then I decided to use the polishes in the box to create a new manicure with palm trees.


First I painted my nails with two coats of China Glaze 'White on White' let those dry and then sponged the Barry M and OPI polishes over the top to create the gradient. The Barry M was picking up the previous gradient layer, not sure if this was due to it being a quick dry polish or if my white base wasn't completely dry. So I sponged the gradient three times to get the colours bright. I also used a liquid latex to cover my cuticles before sponging the gradient. Much less clean up.

I topped coated with HK Girl and as it was late, left the stamping bit for the next morning.

I used all three palm tree designs from the Plate and I also wanted some birds in the design too, but didn't have any stamping plates suitable, so just painted these on free hand. Then when dry just finished off with a regular top coat as I didn't want to smudge the design.

As for the polishes the OPI and China Glaze as always were spot on. The China Glaze was a little runny so make sure you do thin coats as it will pool in your cuticle if you load the brush up with polish. Also my step daughter painted her nails with the Barry M polish and it dried super quick.

Well done nailbox I love what you sent me this month, and what I'm also super impressed with is that as I have A LOT of polish, so far not received anything I have already!

Can't wait till August's box. Have you subscribed to nailbox, and what do you think of the service and what designs have you created with this months Tropical Treat? 

Thursday 23 July 2015

Neon Watermarble Nails

So I'm venturing into the scary world of water marbling once more, and this time it WORKED! I think the trick here was that I left a bottle of tap water in the house for a good few days so it was well and truly at room temperature.

Inspired by the Water Marble queen Colette at My Simple Little Pleasures and this tutorial!


I've seen quite a few Vloggers now doing watermarbling designs with clear polish as this one does. Some brands now are selling specific clear polish to water marble with but I used Essie's all in one base coat and top coat for my water marble which worked fine and I think Colette used a regular top coat too. Just don't use a quick dry top coat like Seche Vite or HK Girl as it won't work.

I copied Colette's colour scheme gradient to start off with, using the following polishes:

Purple - Orly Be Daring
Blue - Nails Inc Kensington Park Road
Yellow - Orly Glowstick


Then I did my water marble using China Glaze 'Liquid Leather' as Colette does in her manicure and the Essie All in One base and top coat and when I had cleaned up I topped with China Glaze 'Fairy Dust'. 


Some nails came out better than others, but overall I'm really happy with my attempt, especially the thumb nail in the picture above. I'm also less scared of having a go at water marbling again, although it is still a bit messy!


Sunday 19 July 2015

Leopard Print?

For some reason I've become a big fan of animal print things lately. I used to really hate any thing animal printy, but it's become less tacky now especially with the interpretations and colour mixes you can now get rather that the old fashioned Bet Lynch leopard print.


Double Leopard print, this has to be a worse fashion faux par than Double Denim.

Anyway, I spotted (no pun intended) this polish in Claire's sometime ago and kept revisiting it, so last time I was in there with the 3 for 2 offer I thought I'd pick it up. I've never seen a polish with Leopard print shaped glitters in it. Here's what it looks like...


and here's the extreme close up...


The polish was a little gloopy and it took a little fishing to get the leopard shaped glitters out, but once you started they were like buses and you seemed to get two or three at once. In fact the shot above looks like I have two layered together.

Not sure I like this look so next time I'll try this over a lighter colour. Also I think I'll just pick out the leopard shaped glitters and place them on my nail leaving out the flakies. Needless to say, this was a bugger to get off the nail. Acetone and foil was required and some picking at the bigger glitters. Let's see if I can make this polish work with some thinner and nail placement.

How do you created your animal print nails? Do you stamp, free hand or use wraps, let me know what you find works best.


Neon, Neon, Neons Part II

My Neon order has arrived and I've been trying out some bright nails. I ordered these little bottles of happiness from The Nail and Beauty Link who have the best prices I've seen for Orly polishes. All prices as shown on the website are without VAT, so these came to £6 each. From left to right these are:

Glow Stick
Risky Behaviour
Be Daring
Fireball


Strictly again you could say some of these aren't true neons, GlowStick definitely is and is described as a true highlighter yellow. I've not gotten round to wearing all of these lovely polishes yet, however as purple is my favourite colour, I chose 'Be Daring' to wear first!


Gorgeous, gorgeous bright purple, and considering that I have many, many purple polishes and is probably the colour I have most of, I don't already have this shade. As will most Orly polishes the formula and brush were up to the job and this was opaque in two coats.

I think I'll try a gradient with the other colours and maybe a go at water marbling like this amazing manicure from My Simple Little Pleasures.


Wish me luck, not had much luck with water marbling, but hopefully using just two polishes I may get away with! 

Here's my other polish purchases I made last week in Manchester from Urban Outfitters, I love their W.I.P polishes and the neon yellow was only £3 in their sale, the shade is very similar to Orly's Glow Stick but this one has a shimmer running through it too.


The other two I picked up where Glitter polishes and these are 'Bits N Bobs' which is a lovely mix of all types of glitter in neon yellow, white and green. The polish at the front on the right is called 'Mardis Gras' and you can see that it's an explosion of all different colours and sizes of Hex glitter. Can't wait to try these, not sure what I'm going to do with them yet!

Wednesday 8 July 2015

Neon, Neon, Neons

Last week some of my favourite nail Vloggers did a collab video on their favourite neon polishes. This is a colour and style I've never sported myself as I often opt for dark vampy shades but for some reason these videos rekindled my nail polish addiction and I hunted down some the top polishes they picked and raided my collection to see if I had anything I could sport until my new bottles arrived.

Seemed I had a few polishes that claimed to be 'Neon' but the jury seems to be out on what each person considered a neon polish to be and don't even start on Neon Pastels.


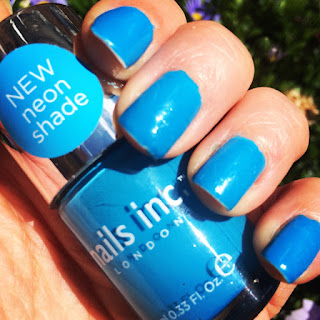
This is Nails Inc 'Kensington Park Road', it's probably not a true neon as it's a blue, but it sure is BRIGHT. I layered this over a white base too in order to make it pop. (Again the jury is out on whether you need to layer a true neon over a white base or not).

I also found a Nails Inc polish in a bright Orange Neon called 'Optic Flame' but my mani chipped quickly and my pointer finger on my left hand that I'd been patching for a week broke off very low so lovely swatching pictures weren't to be...

However some of my Neon polishes have NOW arrived, so I need to create some eye smarting manicures with them and share them with you all!

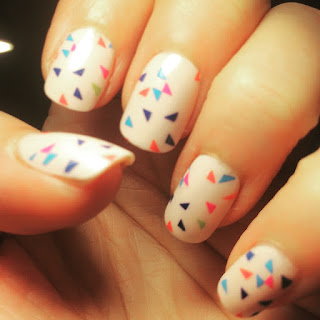
In the meantime, I took a trip to Primark and purchased some of their £1 stick on nails to cover the ruination that is my nails at, they seem to be breaking quite easily at the moment. These have lasted a day so far although my thumb nail did ping off, but was quickly stuck back on with no bother.


Love these little bright triangles, have a thing about triangles at the mo, not sure why! Let's see how long these last! Next stop NeonVille!

Do you love or loathe Neons? Let me know in the comments below and also what you think about Primark Nail products as whole? I have quite a few polishes too, and for a £1 I think their formula's and colours are really good, undecided on the stick on nails though...


nailbox - a monthly nail polish subscription service

In June I stumbled upon nailbox, the first nail polish subscription service in the UK. I'd missed two boxes already so was keen to sign up and see what I'd receive, this was something I'd been looking for...

Nailbox ship their boxes out in the 21st of each month and I picked up mine from the Royal Mail Depo on the 25th as it had been delivered when I was at work and I think needed to be signed for. This is what was inside...


Each box contains four full size bottles of nail varnish and a nail care item. In June the polishes were:

Essie - Roarrrange (A bright orange creme)
Seche Vite - Fast Drying Top Coat
Tanya Burr -Mischief Managed (Red Creme)
Nails Inc - Colville Mews (Nude Creme) 

The nail care item was some cuticle nippers from Elegant Touch which I haven't tried yet and I do try not to cut my cuticles.

I used ALL the polishes to create a gradient starting off with the Nails Inc polish as my base and sponging on the other polishes to create the following manicure.


I'm familiar with Essie and Nails Inc as brands but hadn't tried any of Nails Inc Gel Effect polishes before, the colour was lovely. The red and the orange worked great for the gradient and blended well.

The only couple of complaints I have was that the cap on my Nails Inc bottle perhaps wasn't on tight enough and the bottle top was crusty when taking out the brush which left the polish a little on the thick side, some polish thinner sorted that out. I also wasn't keen on the brush in the Essie polish, I've not had a problem with Essie brushes before, it just seemed a little fanned out.

I was impressed with the Tanya Burr polish having never used this brand before. I topped it all off with Seche Vite which I have used many time before and a new bottle does wonders to blend and dry the gradient.

Overall, very happy with my first box, looking forward to seeing what's in Julys. Have you subscribed to nailbox? If so tell me what you thought of this month's box.