Saturday 31 January 2015

Days 21 & 22 - Three shades of green and Blobbicure

A chance to use three shades of green from my untrieds, main colour here is Revlon in 'Minted'. I painted a white base on my ring finger and used 'Minted' to make the dots along with Rimmel 'Block your Green' and Revlon Parfumerie in 'Balsam Fir'.

I used a small and medium sized dotting tool to create the dots. 


Day 22's theme was Blobbicure and a technique I'd never tried before. I used the end of one of my nail art brushes to create the blob's but perhaps I didn't use enough polish as it came out rather like a large dotticure rather than a blobbicure.


I love the colour combination here, I used two Sally Hansen Complete Salon Manicure polishes here, the dark purple is 'Malbec' and the gorgeous grey/lavender colour is 'Greige Gardens'. 

Tuesday 27 January 2015

Fire and Rainbow - Challenge Day's 19 and 20

Trying  catch up with me days this weekend but still falling behind. This quick evening manicure after the Monet success was a firery type affair. I tried the old marbling on the nail type of technique where you blob a couple of different coloured polishes on your nails and then use a tooth pick to drag and swirl the polish. I think the mistake I made here was choosing polishes that were to close in colour and shade. There are actually four different colours here, from gold to copper and light to a darker red. 

I wanted to use glittery and metallic polishes too to create a more abstract design rather than a obvious yellow to orange to red flame.  


Bright colours and rainbow type nails are not my favourite and I struggled to decide want to do both in last years challenge on the rainbow day theme and this. Oh yes I remember now, I did a Waterfall manicure using a few different colours, so not to gaudy.

This time I took my inspiration from Vlogger Jessface90 who did this rather dazzling Watercolor Nail Art Tutorial using OPI Sheer Tints. I've only used my mini tints once so a perfect opportunity to dust them off.


I used Maybelline Color Show in 'Light Up' which is from their Crystallize collection. It's a textured glitter polish very much like OPI Liquid Sands. The finish is gorgeous and even more so when I took the coloured top coats to it. I tried to merge the colours together and put the blue sheer tint next to the yellow so I'd get a bit of green in there too. Loved the way they came out.

You don't need to buy the OPI Sheer Tints if you fancy a bit of colour in your top coat. You can make your own coloured top coats by just taking a clear top coat (I'd recommend not using a quick dry one) and adding a few drops of any coloured nail polish to get the desired shade.

You can make a whole bottle or just mix together a little on some tin foil or plastic and use straight away. 


Sunday 25 January 2015

Day's 17 & 18 - Inspired by your favourite Blogger and Art!

I've mentioned The Nailasaurus many a time before in my Blog and here's another shout out in Day 17's theme. This design was to be inspired by your favourite blogger, and although I follow many Vloggers (I think that's because I'm lazy and want to watch rather than read) I do keep coming back to The Nailasaurus and her Blog.

This is my interpretation of her Streaky WaterColour Nail Art using a couple of my lovely Models Own Hyper Gel polishes. This Nail Art is so easy to do and so unusual and different. I kinda like these abstract patterned nail art. Will definitely do this one again.


Next was inspired by Art and I started thinking of the Zoya polish I bought all those months ago called 'Monet' that I had neglected and NEVER worn. Shame on me. I went one step further and painted my interpretation of Monet's Water Lilies on my fingers. Here's the pic:


And here's my nails:


Uncanny, I think you'll agree? But seriously, quite happy with how these came out too. Maybe a little much for a day in the office but certainly for a special occasion. I used a similar technique as the Water Colour manicure. I painted a white base on all my nails and watered down all the colours I used with Acetone and built them up to create this impressionist piece of art.


Saturday 24 January 2015

Green Base and Tranquility

Day 15's theme was simply stated as 'Green Base'. Green for me is a funny colour, I do have quite a few polishes in varying shades of green but tend not to reach for them often. 

I copied this design from a picture online but I can't find it now, may have been Pinterest. What I like about this design and not something I do very often is having the two middle nails different to the rest. I used a thin nail art brush for the stripes of colour on the middle nails and topped everything off with China Glaze 'Golden Enchantment'.  


The next day's theme is Tranquility and I've wanted to do a sea type of design for a while. Orginally I'd seen the Nailasaurus Beach Wave Mani. But then when looking though her Blog I saw her Water Colour Gradient manicure and opted for this instead.

I found the video after doing the manicure, so first attempt was a bit of figuring it out. It's OK but next time I'll work longer at building up the colours and merging them into each other.


The ideas was that this looks like the seas which the sound of I find quite calming and tranquil.


Sunday 18 January 2015

Holo and Inspired by Pinterest - Days 13 and 14

It's safe to say that I have fallen behind in the second week, but I shall continue on. Realistically doing a new manicure (with nail art) EVERY day just isn't going to happen. As with the last challenge I'm enjoying trying new techniques, challenging myself and using my untrieds. This is going very well, I have now reduced my untried down to a mere 191 well below half of my collection.

So Day 13's theme was holographic and a nail polish effect I love, but only have a handful of. I'd never used GOSH 'Holographic Hero' before so wasn't sure if it was opaque or not, so I layered it over Revlon Parfumerie in 'Spun Sugar'. I'm not sure why the GOSH polish says for 24 hour wear, I'm not going to be wearing it longer than that anyway.


I topped with HK Girl, as I needed these dry before heading about my day, and the top coat seemed to dull the holographicness (is that even a word?). So I decided I needed something else and stamped this pattern from a Bundle Monster plate. Pretty chuffed with how this looks!

Next was to recreate a manicure from Pinterest, which I do all the time anyway. This is one I've tried before without much success, I couldn't figure out what order to put matt top coat and glitter on and whether to paint or dab the glitter. This time it came out much, much better. Here's the pin:


And here's my attempt...


I used Nails Inc 'Wigmore Street' as the base and Orly 'Fowl Play' for the glitter, turns out painting it on a sponge and then dabbing it on my nails worked best. I then topped them both off with a OPI Matt Top Coat. Lovely!

Friday 16 January 2015

Day 11 & 12's Challenge - Reversed Polarities?

After getting Day 8's theme a little bit wrong I had to check up on Day 11's title of 'Reversed Polarities'. Luckily for me someone else on Instagram asked The Crumpet to clarify and was given the word Negative. So.... I had a go at a reverse gradient striping tape manicure that I saw Colette from My Simple Little Pleasures do on YouTube. This woman knows how to water marble, her designs are awesome.


Here is Colette's tutorial for this manicure.

I used three polishes to create my look, White (Sinful Colors - Snow Me White) a pale purple (Sinful Colors - Sweet Tooth) and a Navy Blue (Sally Hanson Complete Salon Manicure - Blue Rose). I painted my nails in the pale purple and created a gradient using a makeup sponge painted with the colours to dab on to my nails. Once done I topped with a quick drying top coat and placed three lines of striping ribbon on my nails. Then I used the same technique to create a gradient in the opposite direction over the tape. 

Very happy with the outcome apart from the messy edges around my cuticles.

Next up was a manicure inspired by a film. The last challenge I did included this theme too, I did 'Eternal Sunshine of the Spotless Mind'. This time I used little imagination and went with Hunger Games using China Glaze's 'Electrify' from their Hunger Games collection.

I've only used this polish once before and wasn't keen. This time I layered it over Revlons 'Autumn Spice' a lovely dark shimmery brown and I rather like it!


Sunday 11 January 2015

Catching up with day's 9 and 10

Day 9 asked for a Red Base, and red isn't a colour I choose to wear very often, but when I do I'm pleasantly surprised. In this instance I didn't know what to pick as I have quite a number of red polishes that I have yet to try... here's a gander at them! Which one would you have chosen?


That's 10 red polishes I own and have never worn. Now some can be justified, the essie which is a beautiful pillar box red, was part of a set I bought from TK Maxx, and my first essie polishes. Two of the the OPI's were presents, oh and the Nail's Inc and Leighton Denny were freebies from a magazine purchase, so that's half of them justified for.

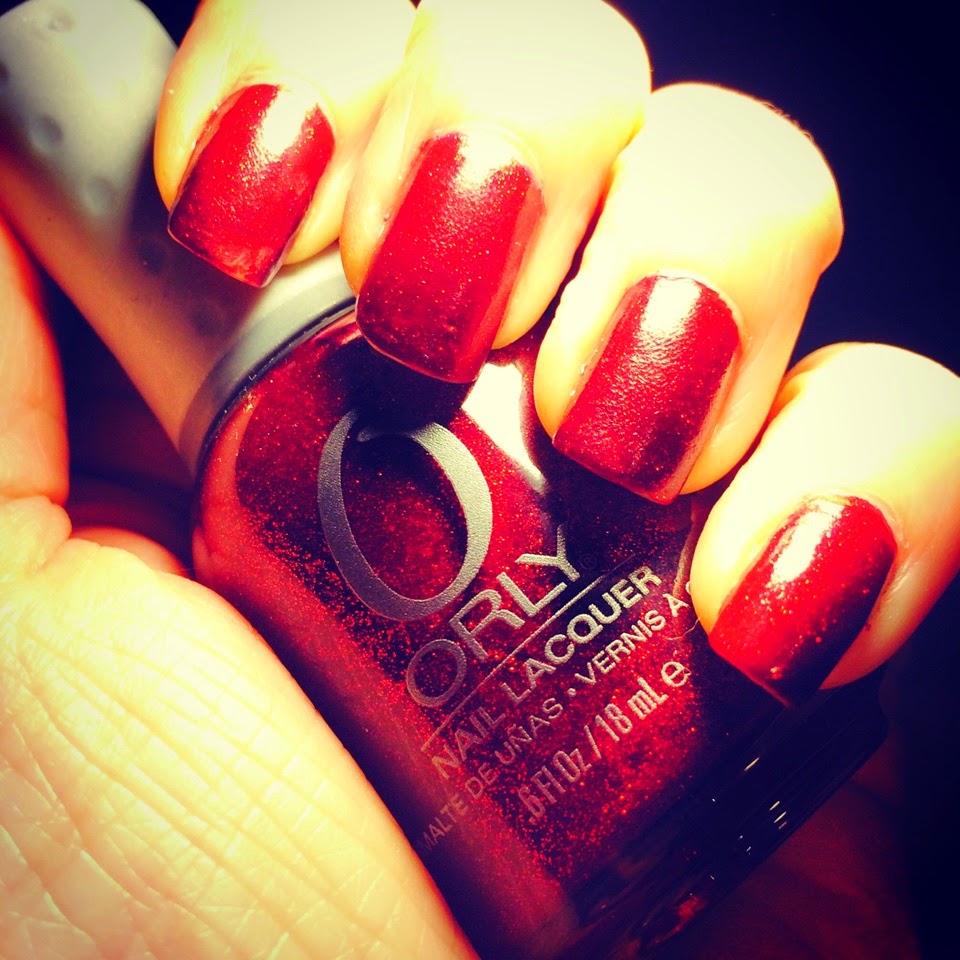
So I chose, OPI's 'Affair in Red Square' for my Red Base manicure and topped it off with Orly's 'Star Spangled Banner'. Picture does this NO justice and I'd be interested to see how opaque the Orly polish would be on it's own, as this really has depth. The micro glitter really looks suspended in the polish. This is going to be my go to manicure if I want red.


Day 10 was glitter base and the last few days with work and training all day Saturday have left me little time to embellish these manicures with some nail art. However the polish I chose below, Maybellines Color Show in 'Rose Chic' from the Crystallize range needs nothing else. 

I can't believe I have NEVER used this polish before, it's freaking gorgeous! Formula is great, finish is slightly textured but not too bumpy and the other thing about this polish is it's one of those that when applied, doesn't look messy AT ALL. You could get a monkey to apply this to your nails and it would STILL look fabulous. I have no idea if you can still get these Crystallize polishes and looking online the range they had in the US was even more awesome!


I'm STILL wearing this, and don't want to take off, and I need to do Day 11's manicure. I do have a feeling that it's gonna need a soaking in acetone and wrapping in foil for removal.

Days 7 & 8 of Nail Art Challenge

OK, I cheated a bit, back at work and training on Monday evening has made me fall behind a day so I painted both hands with Models Own Hyper Gel 'Naked Glow'. Did Day 6's Half and Half on the left hand and this on the right. The theme was Pink and Aqua, so I did some pretty stamping in those colours using my first and December purchased MoYou stamping set. 


Been after some of these bad ass stamping plates for a while, but their range is so vast and so gorgeous I really didn't know what plates to pick first.

This was solved just before Xmas, when I was alerted to the fact that Boots were selling MoYou sets. These sets include two plates, a stamper and scraper, and three stamping polishes for £22.99. SOLD!

There is three to choose from and I got the Mother Nature set pictured below.

I used the pink stamping polish from the set, and because the blue wasn't quite aqua enough, I used Sephora by OPI in "Mermaid to Order', which stamped surprising well.

You can use normal polish to stamp with, providing the colour and pigmentation of the polish is bright and opaque enough. It's just a process for trying them out to see which ones work and which ones don't. General consensus is that Barry M Gelly polishes work really well and the MUA polishes you can get a Superdrug for a £1 do too.

My understanding of Day 8's theme was a little off. The theme was 'Monochromatic' rather than 'Monchrome'. So I could have gone with different hues of one colour rather than just Black & White. But here's what I did anyway, using a bit of striping tape, no cheating here and both hands were painted the same.


Again I can't take the credit for this design and copied this this from Polly Polish. I used Butter London's 'Cotton Buds' as the white base and Revlon 'Espresso' from their Parfumerie range for the black. I smudged the lines by applying my top coat before the black was dry, but overall fairly happy with my attempt!

Day 5 & 6 of 2015 Nail Art Challenge

Time to get the old dotting tools out! 

And this is what I cooked up. I nicked the idea from Pinterest and Paula Passions. Boy is this a gorgeous manicure, colours just pop and I did not want to take this manicure off. I think this is my favourite manicure of this years challenge so far, I will DEFINITELY be doing this again. Polishes used are....

Dark Blue Base - Revlon Top Speed in Royal
Gold - China Glaze in Mingle with Kringle
Aqua/Teal - Sephora for OPI - Mermaid to Order
Purple - Revlon ColorStay in Amethyst
Copper - No17 in Copper


Day 6's theme was Half and Half, wasn't sure how to interpret this, but good old Google and Pinterest gave me this idea. By the way I'm still trying to go through my untried polishes so trying to incorporate these polishes into designs. Two., no THREE untrieds used below!


Base is Models Own Hyper Gel in 'Naked Glow, dark blue creme is 'Stormy Blue by Make Up Academy, a new line that Pound World seem to be stocking not the MUA sold in Superdrug. The Glitter in the picture is Essie, 'Stoke of Brilliance'. Kinda worked, kinda didn't, wasn't too bothered about taking it off, apart from the usual Glitter removal struggle. Meh! I NEED a peal off base coat that works or a glue that I can use which will be quarter of the price. 

Wednesday 7 January 2015

Day 3 & 4 of 2015 Nail Art Challenge

Almost as difficult as Water Marbling is Water Spotting. I've only tried this once before, unsuccessfully. So tried a different approach this time and by the time I did nail four, I think I'd almost got the hang of it. This manicure again is inspired and this time by Oh My Gosh Polish using Picture Polishes 'Fools Gold' a polish created in collaboration with The Nailasaurus. 


The idea behind this manicure is to make your nails look like Turquoise, with the gold glitter in 'Fool's Gold' it's a perfect polish to use. You can use any black creme polish to do your water spotting and the idea starts similar to a Water Marble. 

Take a cup or bowl of tepid water and add a few spots of polish so that it spreads out. You can then use any alcohol based spray on the polish to make it separate or 'spot'. Previously I tried it with HairSpray and nail varnish remover in a small spray bottle I bought, but it just didn't seem to work.

I've seen tutorials that use a spray hand sanitizer, but I couldn't find anything other than gel. I also tried a cheap perfume but that didn't work for me either. In the end I took one of my nail art brushes dipped it in acetone and tapped it on the side of the cup to spot the varnish, which seemed to work. First attempt on index finger was a botched job, too much polish, got there in the end though and now I kinda know what I'm doing, I'll give it another go.

Day 4 was tagged 'Hapiness' and I really didn't know what to do, so I just painted my nails my favourite colour purple (China Glaze 'What a Pansy') and stamped by favourite little black furry friend on them.


This is in honour of my puss cat Peedles, who is a very happy kitty indeed and makes me very happy too. Here she is in all her furryness!


Have you ever seen such a happy puss puss?


2015 Nail Challenge

So start as you mean to go on, especially as I neglected my Blog in December. Let's start the New Year off with a Nail Art Challenge!

I follow some amazing ladies on Facebook doing some pretty funky nail designs. One of these ladies called Debbie, otherwise known as 'The Crumpet' has devised the following 2015 Nail Art Challenge.  I love the picture she has of herself, when she was little at the top of her Blog, I have never seen a face so CHEEKY!


First up, I started my Challenge how I ended lasted years by following a tutorial by another of my favourite Bloggers 'The Nailasaurus'. This 'Nimbus Tutorial' is a technique I've wanted to try for a while. I not only followed her tutorial but also her colour scheme, not the exact polishes, but ones that were the closest colour match.


The technique here is to paint a light coloured base coat, I used a very light pastel purple from Sinful Colours in 'Mauve'. Then pick three to four complimentary colours, I used three. Starting with the lightest first, pop a splodge on a palette or bit of plastic/foil and water it down with some acetone until it's watered down but still retains some colour. A bit like painting with water colours.
You can test it on some paper first before applying to your nails, take a cotton bud, dip it in the watered down polish and randomly apply to each nail.

Then do the same with the other two colours. To tie in the whole design The Nailasaurus recommends to use your base colour as the final colour to water down and apply to your nails. You can repeat the whole process with the colours until you get the finish you want.

Polishes I used are, Salon Hansen Complete Salon Manicure in 'Bewitched' GOSH in 'Altered Blue' and Barry M in 'Prickly Pear'. I may have used GOSH in 'Berry Me' too. I can't remember if it was too similar to the Salon Hansen polish.

Day 2 is 'Tape Mani'! I scoured the intertubes for inspiration and wanted to try something different and challenge. I found this on Google from the Sois Polish, check out the lines on their manicure.

Mine was a combination of striping tape and having a go at hand drawing the lines, which didn't work. I love the design and colours, just a bit more practise and more time I think I could tidy up the edges. Polishes users were Sinful Colors 'Snow Me White' as the base, 2true 'Nicole' and Barry M 'Prickly Pear'.